While cleaning out my office (a much needed task!), I came across many things and one of them was quite timely, so today, enjoy a DOUBLE Friday Tech Tip! A virtual field trip from Scholastic on the first Thanksgiving.
There are also book suggestions, printables, and additional websites to check out, including Plimoth Plantation.
Overall, there are a great number of resources available for learning more about our Thanksgiving tradition and exploring a little deeper as this holiday approaches.
And I thought to myself, well this must be a cost based program. Then I thought to myself, but none of the Smithsonian museums charge entry. Lo and behold Smithsonian Education's offerings are FREE, FREE, FREE (one of my favorite words in technology). And, the offerings are not limited to mythology, a topic that greatly interests many of my K-5 students, but isn't strictly a part of our curriculum.
Here are some examples (just a few) of topics that DO integrate quite well with our curriculum:
Well, school's out, but I've gotten this question on multiple occasions and since you all will be accessing email from home (or not, which is also ok in the summer :) I thought I'd make things a little easier on the eyes. Over spring break, we switched to the Microsoft Outlook Email Web App. Which sounds lovely. But some of the changes were a little abrupt. Here are the two nagging issues I've heard about most often. If you have more, post them in the comments and I'll see if I can figure 'em out.
How do I change so that my messages are not in conversation view?
1)Click on the down arrow next to arrange by date.
2)Uncheck the box next to conversation.
That is all.
How do I make it so that deleted items are deleted and not crossed out?
1)Click on options
2)Click on See All Options
3)Click on Settings
4)Check the box next to hide deleted items
5)(Also, if you are not in conversation mode, I don’t think these will show up)
Sorry there are no fancy screen shots or step by step videos but...have a great SUMMER!!!
If you aren't getting notifications from My Learning Plan to let you know when new workshops are being offered or when you have one coming up, you should check your settings to do so. It's as easy as 3 clicks. Once you are signed on to MLP, click on My User Profile under Account Settings on the far left side near the bottom of the page. Under email notifications, select Yes for New Activity Notification. Select Yes for Upcoming Activities Reminder and set it to a reasonable number of days in advance. For example, when mine was first set up, it was for 14 days. So EVERY DAY for 2 weeks prior to an upcoming workshop, I would get a reminder. For me, that wasn't necessary. I've reset mine to 3 days which is enough of a reminder period to jog my memory if I didn't have the event already in my calendar. Be certain that the email associated to your MLP settings is accurate and don't forget to SAVE changes at the bottom of the screen.
Just last week, I was introduced to "The Great Behavior Game" a free program from Educator's Handbook which can be incorporated into the classroom for behavior management or for review game purposes. The initial purpose is for behavior management. On the main page, educators can sign up for a free account, add a roster of their own students or teams of students. I created the video below to demonstrate how the program works.
Don't forget to click "enter" after typing a name. I didn't know to do that initially, and you don't get far that way. Utilizing this program on your smartboard provides a visual for students who need an extra reminder of their progress and the wireless mice and keyboards that we have in classrooms offer students the freedom to move around the classroom and have easy access to the "game". In addition to the idea of creating a roster with individual student names, you could also create a roster with Our Class or some other name as decided by the class and utilize this as a whole class behavior management system or split your class into four teams. When I was a grade level teacher in the classroom, I had a three tiered approach to behavior management and could see this system being utilized for any of the three.
During game play, there are three controls to know as outlined on the main page of the program.
How to Play
Start the game and project the scoreboard. Teach your lesson as usual. Referee the game by awarding bonus points and penalties. Reward high scoring students throughout the day.Innovative Game Play
Whether you have a class of 6 or 26, the innovative game board is designed to put you in control. Start the game when you begin the school day and let it run while you conduct your lessons. Each student game piece has three different modes:
Earn
When you start the game, your students will begin automatically earning points. Special points – stars – will be awarded every ten consecutive points. Single-click a game piece to award a bonus point for appropriate behavior.
Timeout
Click-and-hold a game piece to assign a timeout. A red progress bar will count down the time remaining. During timeout, the student will not earn points and his or her progress toward the next star will start over. If the need arises, click the game piece during timeout to restart the counter.
Freeze
If a student continues to exhibit disruptive behavior during timeout, you can click-and-hold the game piece again to place the student into a freeze. During a freeze, the student will not earn points, and he or she will stay in the freeze until you release it with another click-and-hold action.
Our school district subscribes to a video source that is quite comprehensive and is housed on our network. Safari Montage is a searchable directory of videos that can be utilized for educational purposes. The service grants home access for teachers and students as well.
This video covers some of the basics of Safari Montage.
Noticed one inconsistency in this video - I don't belive we can access live TV through our Safari Montage package...but I'll check into that further.
In our district, teachers can log in through the staff tab on our district homepage.
A teacher's network username and password (i.e. the same one to logon to the computer, email, etc.) is used to access Safari Montage. When logging in, ensure that the School dropdown indicates your school. In our case, Pine Road ES. As the homepage pictured below indicates, video providers include:
Magic School Bus
Bill Nye the Science Guy
National Geographic
Scholastic
Weston Woods
PBS
Arthur
Sesame Street
Reading Rainbow
History Channel
One of the great positives to this service is the search feature. You can limit your search to specific grade levels and topics beyond your search term. Create a playlist for an area of your curriculum for quick and easy access to videos to support your lessons! Happy Friday!
I missed posting a tech tip last week as I was in book fair bonanza mode. So, you don't really get a two for one, but this is also for this coming Friday...so make of that what you will.
QR Codes or Quick Response Codes can be found on billboards and marketing materials, but (at least it seems) QR Codes themselves were never marketed, so most people don't really know what they are, what they're for, or what to do with them. Some savvy smartphone users may have downloaded a free qr code reader on their phone. Using this, the smart phone and its camera can make sense of the mess of a black square which really directs you to...something. Either a webpage, or a video, or another piece of online media. Now that you know what they are, a scannable link, let's discuss how you can use them.
Kaywa is the site I most associate with QR Codes. To generate a code, I use Kaywa's QR Code generator. Super easy. You copy and the link you want to connect to and paste it into the URL box. You can also generate a code for text, a phone number, or a text message. And...it's FREE!
You can choose to make your QR Code square small, medium, large, or XL depending on your purposes. Click generate, and you get a code. You can then copy and paste that code however you like. In the school library, I have used QR Codes for a few different purposes.
Business Cards for Back To School Night (the code takes you to our library homepage)
Bookmarks for Back To School Night (three different codes take you to our homepage, catalog, and this very blog)
Bookmarks for Library Volunteers (the code takes volunteers to the sign up page for our information session)
Book Fair Online Fair (the code takes interested buyers directly to our online book fair)
How I hope to use QR Codes...one day
Book Trailer links affixed directly to books
Scavenger Hunts and/or Webquests for Library Lessons
This past Tuesday, many of us (at Murray) started using Edmodo for the first time, and were excited to begin to realize its ease of use and practical applicability to 21st century skills, like working collaboratively and using information, communications & technology to name a few. ( http://www.p21.org/overview/skills-framework.)
However, by the end of the 'intro to edmodo' sessions, there were a bunch of little unanswered questions.
One was how to change the color assigned to a group (they all come in as blue by default).Color coding can make groups easier to organize visually, and make your calendar view much friendlier.
Changing the color is a snap.Here’s how:
1.In Edmodo, find the group you want to change in the group list on the left.
2.Click the small blue square to the left of group name.A color picker pops up.
3.Pick and click your new color.
4.Voila!New color.
If you have other Edmodo questions or issues, let me know and I’ll try to address them in future Friday Tech Tips!
I've been hearing a lot about curation lately. And I've been trying to wrap my brain around that. I think it's essentially a way of discussing something we have long been doing as teachers. Collecting the best resources for our students (and for ourselves!) One of the ways we curate information is on social bookmarking sites like DIIGO and Delicious, but another way is by making lists of links on our school websites. I've been meaning to organize my many, many lists of links, but in the meantime, here are some to get you started. If you don't have pages on your own website with such links, you can always link to another teacher, our technology teacher, or to the library with some great information already collected.
Here are some examples of curated go to website lists.
Awesome Authors (an example of a page that will definitely continue to grow!) Reliable Resources (this is also an example of a page I'd like to further organize...)
Each classroom teacher may have a different set of needs depending on the grade level and subjects they teach. The more we prepare these lists, the easier it is to point students in the "right" direction to appropriate resources that we have previewed and explored.
On November 1st, we held our first meeting of the Building Tech Team with teachers. One of our teachers, Ms. Veneziale, skyped last year with her first grade class following a pen pal project with a class in neighboring Hatboro-Horsham School District. Ms. Veneziale presented how she framed her class project, some things that worked and some that did not (or presented opportunities for her to show just how flexible and patient she is!). We discussed other possibilities for skype in the classroom as well as the nuts and bolts (cameras and microphones). Check out the resources we curated here. Add your name to the list of skyping teachers and add ideas to how you might use skype in your classroom.
This Friday tech tip is coming a day early, in preparation for next week when Murray and High School staff will be introduced to our district's 'Google Docs for Education' accounts, or 'LMDocs' for short.
LMDocs are district-sponsored Google accounts, that permit both staff and students the wicked awesome power of using Google Docs. More on that in the near future. But for now, the tech tip:
I had heard that the login process might be a little awkward/complicated the first time through, so I made a screencast of trying to log in for the first time myself. (A 'screencast' is a recording of what's going on on your screen, together with audio narration.) My hope was that I could preview any trouble spots and provide workarounds for you.
The upshot is this: to log in, you need to go through two "Captchas" (those little wavy letter things that you sometimes need to enter online to prove that you are a human and not a machine.) Other than that, it's pretty straightforward.
You can watch the screencast of the login process (it's a little over 3 minutes) below:
More on Google Docs in the near future! Happy logging in!
SMART Exchange is a great resource for finding SMARTboard compatible lessons with interactive elements without reinventing the wheel. You can narrow your search by subject and/or grade level to customize your results.
Here are results for Halloween lessons by different grade levels. See what meets your needs and explore for lessons in different areas of your curriculum as well.
Sometimes you need to review a student's grades with them, so you pull up their grades to date in your eSchool Gradebook, but don't want them to see the grades for the rest of the class.
Violation of privacy.
There's a solution. Just display the single row of grades for that particular student before you call them up. Here's how:
Click anywhere in the row that you want to display. The row will indicate that it's been selected by displaying a highlight color on the student's name to the left.
In the upper right hand corner of the table containing all of the grades for the whole class, there is a small checkbox titled "Show Only Selected Row."
Check it.
Now, only that student's records are displayed. Privacy preserved!
To undo it, just uncheck the box; it toggles on or off.
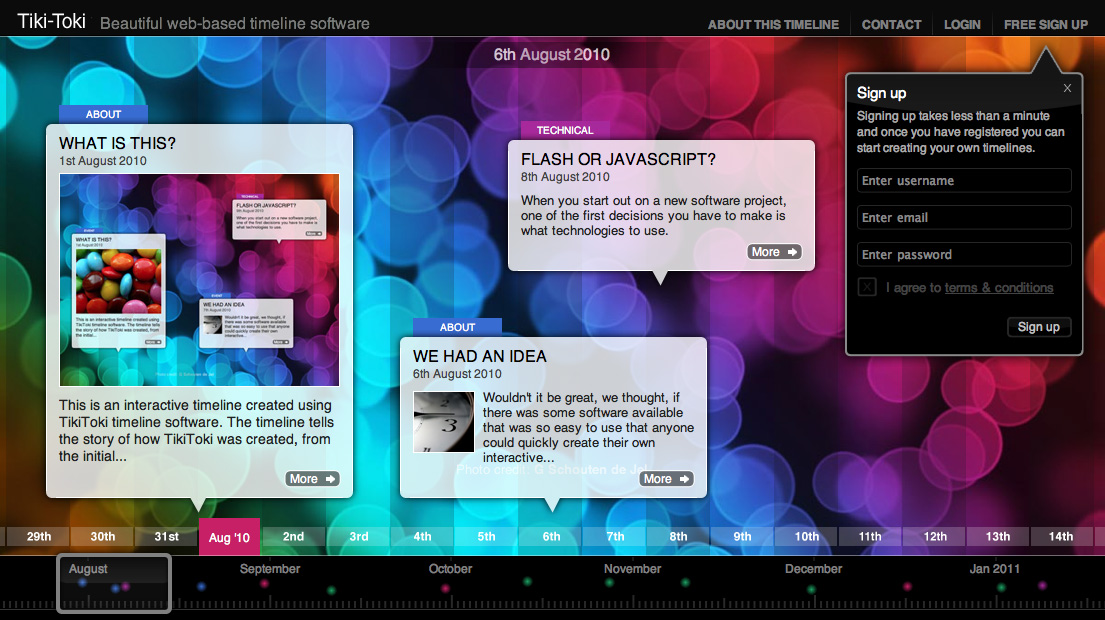
Tiki-Toki is a web2.0 tool that creates really beautiful interactive timelines that you can share on the web. Tiki-Toki works in your internet browser, is really simple to use, and there’s nothing to download. With an email address a user can sign up for a free account (which limits you to one timeline.)
You can embed images, video, and audio easily, and there’s built-in integration with Flickr for images and YouTube and Vimeo for videos. Students can sharing a timeline easily by copy and pasting a URL that can then be emailed or posted to a teacher, friends or colleagues.
I’ve just introduced this tool to my 7th grade classes, and they’ve produced some pretty impressive results. Here are two student examples, followed by some other examples of what could be done with this tool:
The range of uses is vast, including charting the life of a famous artist or musician, documenting a family history, keeping a personal journal, or exploring key historical events.
Here’s a brief overview on YouTube:
Tired of backing up your favorites on your school computer every time the machines are re-imaged? Or worse, losing all those valuable links? Or worse still, giving up on the idea of saving valuable web links at all? Social Bookmarking is just the thing for you. If you would love to access all your bookmarks at home or school (or anywhere you get web access, which anymore is anywhere), then a social bookmarking site is the answer. There are two options I'll write about today.
Before I do so, let me preface this information with some background. I was first introduced to Social Bookmarking and thought it was silly, unneccessary, and not for me. As I did with twitter. I knew the websites I visitied and had no need to "share" them with the world. I was thinking about this all wrong. I can have websites I visit to check my bank account balance, credit card balance, etc. and not share those. But, when it comes to a professional capacity, I can share my "discoveries" and save them for later reference by using a Social Bookmarking service...for free!
My first social bookmarking tool was Delicious, formerly del.icio.us and featured in the Common Craft video for Social Bookmarking.
You can use either Social Bookmarking tool to do the same job. Right now, I prefer Diigo, but that is also because it was predicted that Delicious was on the way out. While it is under new management and I know some people who lost their bookmarks as a result, according to Joyce V, the reports of its death were greatly exaggerated.
I also like the groups feature in Diigo and have one started but I thought I'd let you all dip your toes in before we start formally sharing...but it's coming.
Here is a whole "course" devoted to the task of creating an email signature in Microsoft Outlook 2010. On this page, just click "start this course". These options are very snazzy and comprehensive. But, there's that "ribbon-reference" again.
And here is a one minute video that sums up the process.
And, for the final frustration. I've heard from folks that they create a signature in outlook, but then it doesn't show up in web-based. My fundamental understanding of this is that you have to go through the same process twice. In both outlook express (on your computer in school) and in web-based Microsoft Outlook Email. If that understanding is incorrect, please address a "fix" in the comments section.
*UPDATE*
Before you create a contact group with parent emails, you must enter the parent emails in as individual contacts. Then you can add them to your contact group. So, step 1: create new contacts for each parent (or person that you will need to add to a contact group). You do not have to do so for other teachers in the building/district because they are in the global address book. To create an individual contact, try these steps.
Also, once it comes time to send an email to your contact group, find your contact group in your address book and double click on them. When your contact group is open, click on the button that says "MAIL". This will create a new message to this contact group. You SHOULD always put the group name in the BCC line when sending to a large group so that reply all is not a function, so copy and paste into the BCC line, or when constructing a new email, click on the BCC to add your contact group there. Confused now...
*ORIGINAL POST*
Several people have asked questions about creating distribution lists and adding members to that list in our Microsoft Outlook email. I had originally planned this topic for my first tech tip following Back to School night as many teachers create class lists of email addresses collected at Back to School Night. Only problem...my computer hasn't been updated with Microsoft 2010. So, if I did a video or screen shots of the process, it would still reflect the 2003 version. Those days are gone. Second snafu I was facing was that if I did a video or screenshots of my own email account, I might be inadvertantly sharing email addresses or email content that was not meant for the world wide web and I wouldn't do that without appropriate consent. Fortunately for us all, someone else already did! Often, when I hit a stumbling block when it comes to technology and the how-to's of it, I turn to my trusty friend, Google, or YouTube. While these searching machines can turn up un-trusty info in the researching realm (at times), in the how-to department, they are a veritable gold mine. So, in additon to the actual "tip" of the day, a word of advice. If you find yourself stuck or think you should be able to do something tech-y, take the plunge. Google it! For example, I typed in "how to create a distribution list in microsoft outlook 2010" and voila!
Upon further reading, I have now realized that Microsoft has decided to call their distribution list a contact group. So, today's tech tip is now the artist formerly known as distribution list, i.e. Contact Group. Slight sidebar. During summer Microsoft 2010 training, our trainer was trying to gauge prior knowledge and asked if we knew, for example, what a ribbon was. I know what a ribbon is. And it has nothing to do with Microsoft. Call the toolbar a toolbar - don't go changing the names. With that said, contact group at least seems like a sensible name change.
This Friday, Pine Road and Murray Avenue will be merging our tech tip genius in one location. Here! Mr. Kelly from Murray Avenue School will also be posting a Friday tech tip to double the fun at ontheshelf4kids. To access all the tech tips at once, you can click on "Tech Tips" in our tag cloud (ahem, label cloud...Blogger changing names of things too...oh well!) Enjoy!
On The Shelf 4 Kids has graciously agreed to archive the Friday Tech Tips from Murray Avenue... and this is the first! Enjoy!
It happens to all of us.
We're in there, doing it, teaching our lesson, when suddenly the lesson is interrupted by a computer chime and a little message in the corner of the smartboard showing everyone in class a summary of the email you just received. Disruptive and annoying at best. A violation of privacy at worst.
If you don't want them, turn 'em off!
It's different in Outlook 2010 than in the old Outlook. Here's how:
In Outlook, click on the orange 'File' tab in the upper left hand corner.
Once you are there, select 'Options' from the list on the left.
In the options window that pops up, choose 'Mail'.
On this page, under 'Message Arrival', do the following:
Uncheck 'Play a sound'
Uncheck 'Display a desktop alert'
(By leaving 'Show and envelope icon in the taskbar', you can still be alerted when you have new mail, but it isn't disruptive to your lesson flow.)
Since we have a long weekend (wahoo) and don't have school on Thursday or Friday, I thought I'd post my tech tip today. Today's tech tip will point you in the direction of an image creation site I default to often. Big Huge Labs has many different photo editing options including, but not limited to: